

Last Friday night, my 8-year-old announced she needed to bring a treat to school on Monday for her friend’s birthday celebration. Of course, she told me this at 8:30 PM while I was already in my pajamas, thinking the hardest decision I’d have to make was which Netflix show to watch.
My husband looked up from his laptop and said, “Didn’t she mention this earlier this week?” She had. Multiple times. But in my defense, Friday-night-brain doesn’t retain Tuesday-morning information very well.
That’s when I remembered these ridiculously simple Oreo balls sitting in my back pocket for exactly this kind of parenting emergency. Three ingredients, no oven, and they look like I spent hours making fancy truffles.
Thirty minutes later, I had two dozen perfect little chocolate-coated spheres cooling in the fridge, my daughter was doing her happy dance, and I felt like I’d somehow pulled off a minor miracle.
These no-bake Oreo balls have become my secret weapon for last-minute dessert needs, potluck contributions, and those moments when I want to look like a dessert genius without actually being one.
Why These No-Bake Oreo Balls Are Pure Magic
They’re impossibly simple. If you can crush cookies and stir things together, you can make these. No special skills, no fancy equipment, just basic mixing and rolling.
The flavor is incredible – Rich, creamy, and intensely chocolate-y with that signature Oreo taste in every bite. They’re like eating the best parts of cookies and cream ice cream in truffle form.
No oven required – Perfect for hot summer days, tiny kitchens, or when you just don’t want to deal with baking and cooling times.
They look incredibly impressive – People assume these took hours to make and involve some kind of pastry chef magic. Let them think that.
Completely customizable – Change up the cookie flavors, coating colors, or toppings to match any occasion or preference.
3-Ingredient No-Bake Oreo Balls Recipe
This recipe makes about 30 balls, depending on how big you roll them. In my house, they disappear so fast I usually double the batch. Here’s what you’ll need:
Ingredients
| Ingredient | Amount |
| Oreo cookies | 30 cookies (save 4 for garnish if desired) |
| Cream cheese, room temperature | 8 oz (1 package) |
| White or milk chocolate chips/melting wafers | 7 oz |
Tools You’ll Need
- Food processor or large zip-top bag + rolling pin
- Large mixing bowl
- Baking sheet
- Parchment paper
- Small cookie scoop or spoon
- Microwave-safe bowl
- Fork or dipping tool
Step-by-Step Instructions for Oreo Balls

Step 1: Prep Your Workspace
Line a baking sheet with parchment paper and set it aside. This is where your rolled balls will chill, and trust me, you don’t want to be scrambling for parchment paper with sticky hands later.
Step 2: Crush the Oreos
Place 30 Oreo cookies in your food processor and pulse until they form fine, even crumbs. No food processor? No problem. Put the cookies in a large zip-top bag, seal it, and go to town with a rolling pin until they’re finely crushed.
The key here is getting them evenly crushed – you don’t want big chunks that make rolling difficult, but you also don’t want them powdered into dust.
Step 3: Mix the Base
In a large mixing bowl, combine the crushed Oreos with the room temperature cream cheese. This is crucial – cold cream cheese will create lumps that never quite disappear.
Use a spatula or electric mixer to blend until the mixture is smooth and evenly combined. It should hold together when pressed but not be overly sticky.
Step 4: Roll Into Balls
Using a small cookie scoop or spoon, portion out the mixture into roughly equal pieces. Roll each piece between your palms to form smooth balls about 1 inch in diameter.
Don’t worry about making them perfectly round – a little imperfection adds to their homemade charm. Place each ball on your parchment-lined baking sheet.
Step 5: Chill for Success
Pop the entire tray into the refrigerator for at least 15 minutes, or the freezer for 10 minutes. This step is non-negotiable – chilled balls hold their shape much better when you dip them in chocolate.
Use this time to clean your workspace and prep your chocolate.
Step 6: Melt the Chocolate
Place your chocolate chips or melting wafers in a microwave-safe bowl. Heat in 30-second intervals, stirring after each, until completely smooth and melted. This usually takes 90 seconds to 2 minutes total.
Don’t rush this step with longer intervals – burnt chocolate is grainy and can’t be saved.
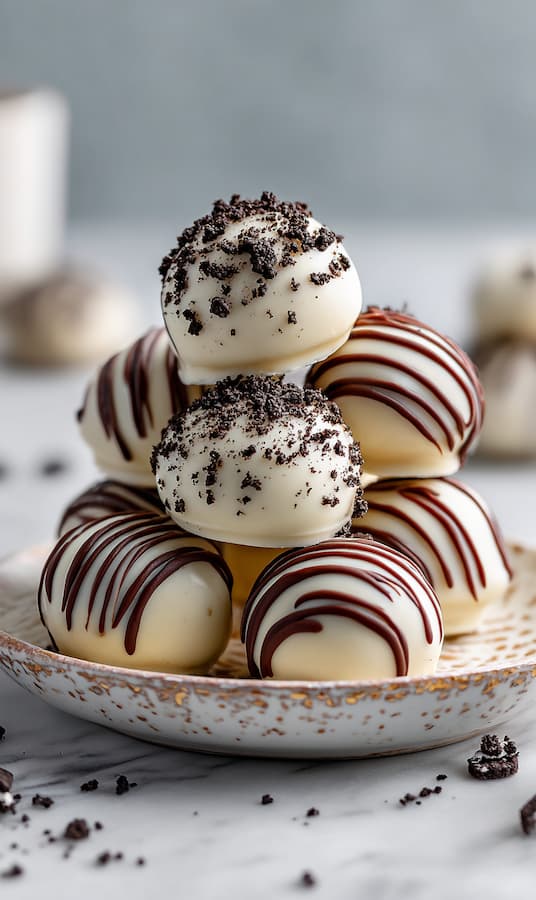
Step 7: Coat the Balls
Working one at a time, use a fork or dipping tool to dip each chilled ball into the melted chocolate, ensuring it’s completely coated. Gently tap the fork against the bowl’s edge to let excess chocolate drip off.
Place the coated ball back on the parchment paper immediately.
Step 8: Add Toppings While Wet
If you’re using sprinkles, crushed Oreos, or any other toppings, add them immediately while the chocolate is still wet. Once the chocolate sets, toppings won’t stick properly.
Step 9: Final Chill
Return the tray to the refrigerator until the chocolate coating is completely set, about 15-20 minutes. The balls should feel firm and the chocolate shouldn’t smudge when touched.
Storage and Serving
These Oreo balls keep beautifully in an airtight container in the refrigerator for up to one week. For longer storage, you can freeze them for up to 2 months – just thaw in the fridge before serving.
I like serving them slightly chilled, as the texture is perfect – firm enough to hold but creamy enough to melt in your mouth. Room temperature is fine too, but they can get a bit soft on warm days.
For parties, I usually take them out about 30 minutes before serving to take the chill off.
Tips for Perfect Oreo Balls Every Time
Room temperature cream cheese is crucial. Cold cream cheese creates lumps that never fully smooth out. Take it out of the fridge at least an hour before making these.
Don’t skip the chilling step. Unchilled balls will fall apart or lose their shape when you try to dip them in chocolate.
Work quickly with chocolate. If your chocolate starts to thicken while dipping, microwave it for 10-15 seconds to thin it out again.
Use a fork for dipping. It allows excess chocolate to drip off better than a spoon and gives you more control.
Creative Variations to Try
- Double Chocolate Oreo Balls: Use chocolate Oreos and coat with dark chocolate for serious chocolate lovers.
- Mint Chocolate: Use mint Oreos and add a drop of peppermint extract to the cream cheese mixture. Perfect for holidays.
- Peanut Butter Twist: Add 2 tablespoons of creamy peanut butter to the cream cheese mixture for a nutty flavor.
- Seasonal Colors: Use white chocolate and add food coloring to match holidays or party themes.
- Cookies and Cream Bars: Press the mixture into an 8×8 pan, chill, then cut into squares and dip in chocolate.
- Birthday Cake Version: Use Birthday Cake Oreos and add colorful sprinkles for a festive twist.
Perfect for Every Occasion
These Oreo balls work for virtually any event:
- Kids’ parties (they’re like fancy cookie dough balls)
- Holiday gatherings (customize colors and toppings)
- Potluck desserts (always a crowd favorite)
- Gifts (package in cute boxes for teachers or neighbors)
- Last-minute entertaining (because we’ve all been there)
Frequently Asked Questions
Can I use reduced-fat cream cheese? I don’t recommend it. Full-fat cream cheese gives the best texture and flavor. Light versions can make the mixture too soft.
What if I don’t have a food processor? A rolling pin and sealed bag work perfectly. Just make sure to crush the cookies evenly.
Can I make these dairy-free? Yes! Use dairy-free cream cheese and dairy-free chocolate chips. The texture might be slightly different but they’ll still be delicious.
How far ahead can I make these? Up to a week in the fridge or 2 months in the freezer. They’re actually better after sitting overnight.
Final Thoughts
These no-bake Oreo balls represent everything I love about simple, crowd-pleasing desserts. They taste like you spent hours in the kitchen but require minimal actual work. They look elegant enough for grown-up parties but are fun enough that kids go crazy for them.
Most importantly, they’ve saved me from countless dessert emergencies. Whether it’s a forgotten school party, an unexpected guest, or just a random Tuesday when everyone needs something sweet, these little balls of chocolate heaven deliver every single time.
The best part? Watching people’s faces when they bite into one and realize just how incredibly good something so simple can be. They’ll ask for the recipe, and you can just smile and say it’s a family secret.
Or you can share it, because honestly, the world needs more of these in it.