

Last Sunday, I was staring into my fridge at 5 PM with absolutely no dinner plan, when my 8-year-old walked in and announced he was “starving to death.” Dramatic much?
My husband poked his head around the corner with that look that said, “Please don’t let this turn into another cereal-for-dinner night.”
That’s when I remembered this casserole sitting in my back pocket like a dinner superhero.
I threw everything into one dish, slid it into the oven, and an hour later we were all fighting over seconds. My son declared it “better than pizza,” which is basically the highest compliment in our house. Victory. Achieved.
Here’s the thing about this recipe: it’s foolproof, it’s cozy, and it saves your sanity on those nights when adulting feels impossible.
Why You’ll Love This Chicken and Rice Bake
One-Dish Wonder – I’m all about minimal cleanup. Everything goes into one pan, which means more time with your people and less time scrubbing dishes.
Crazy Creamy and Cheesy – We’re talking cream of mushroom soup, milk, and a generous blanket of cheddar that gets all golden and bubbly on top. It’s comfort food at its finest.
Super Flexible – Got some leftover veggies? Toss them in. Want to switch up the protein? Go for it. This recipe plays nice with whatever you’ve got.
Kid-Approved – Even the pickiest eaters in your house will clean their plates. I’ve served this to friends’ kids who “don’t like casseroles,” and they came back for thirds.
Even Better Tomorrow – Leftover casserole is like a fine wine. All those flavors get cozy overnight and taste absolutely incredible the next day.
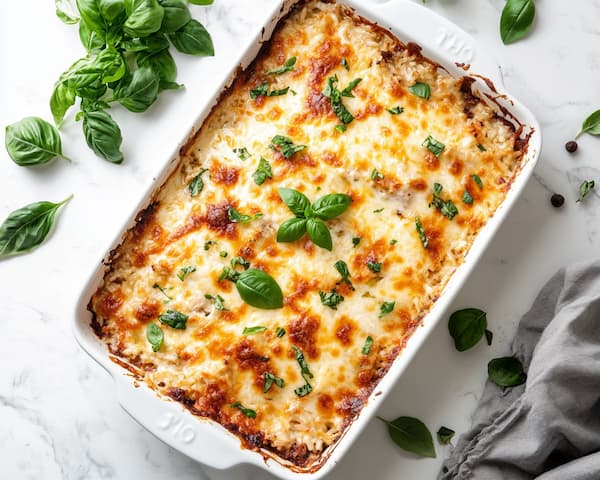
Cheesy Chicken and Rice Casserole Recipe

Here’s everything you need to make this magic happen:
Ingredients
| Ingredient | Amount |
| Boneless Skinless Chicken Breasts | 3-4 pieces (thick-cut) |
| Long-Grain White Rice | 1½ cups |
| Cream of Mushroom Soup | 1½ cans (10.75 oz each) |
| Water | ¾ cup |
| Whole Milk | 2½ cups |
| Sharp Cheddar Cheese, shredded | 2 cups |
| Onion Soup Mix | 1 packet |
| Paprika | ⅓ tsp |
| Fresh Parsley (or dried) | 1 tsp |
| Salt & Black Pepper | To taste |
Tools You’ll Need
- 9×13-inch Casserole Dish – This size gives you the perfect depth for even cooking
- Large Mixing Bowl – For whisking together your creamy base
- Measuring Cups & Spoons – Because even forgiving recipes need some structure
- Whisk or Large Spoon – To get everything smooth and combined
- Aluminum Foil – Your secret weapon for preventing over-browning
Step-by-Step Instructions
Step 1: Get Your Oven Ready
Preheat your oven to 350°F and generously grease a 9×13-inch casserole dish. I like using butter for extra flavor, but cooking spray works great too. Trust me, you’ll thank yourself later when cleanup is a breeze.
Step 2: Make Your Creamy Base
In a large mixing bowl, whisk together the cream of mushroom soup, milk, water, and onion soup mix. Keep whisking until it’s completely smooth. No lumps allowed! This mixture should be pourable but slightly thick. It’s going to keep everything creamy and delicious as it bakes.
Pro tip: I always taste this mixture and adjust the seasoning here. It should be well-seasoned because it’s flavoring your entire dish.
Step 3: Layer Like a Pro
Spread your uncooked rice evenly across the bottom of your greased dish. Pour that gorgeous creamy mixture right over the rice, making sure every grain gets coated.
Give the whole dish a gentle shake or tap it on the counter. This helps the liquid settle into all the nooks and crannies, so your rice cooks evenly.
Step 4: Add the Star of the Show
Nestle those chicken breasts right on top of the rice mixture. Press them down gently so they’re partially submerged in the liquid. This keeps them incredibly moist while they cook.
Season the chicken with paprika, salt, and pepper. The paprika not only adds flavor but gives everything a beautiful golden color that makes the dish look restaurant-worthy.
Step 5: The Magic Happens
Cover your dish tightly with foil. This is crucial because it traps all that steam, ensuring your rice absorbs the liquid properly and your chicken stays tender and juicy.
Slide it into your preheated oven for 50-55 minutes. This is when I usually pour myself a glass of wine and enjoy the amazing smells wafting from the kitchen.
Step 6: The Cheese Moment
After 45 minutes, carefully remove the foil. Your rice should be tender and most of the liquid absorbed. If it looks a little soupy, don’t panic! It’ll continue thickening.
Sprinkle that beautiful shredded cheddar evenly over the top. I’m generous with the cheese because life’s too short for skimpy portions.
Back into the oven it goes, uncovered this time, for another 15 minutes. You want that cheese melted, bubbly, and just starting to turn golden.
Step 7: Patience, Then Perfection
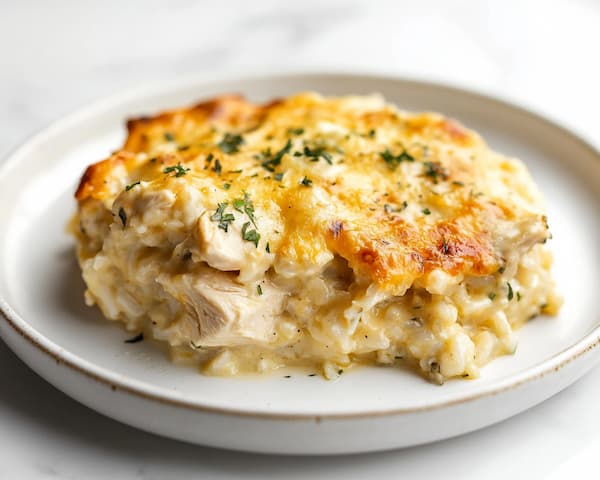
Let your masterpiece rest for 5-10 minutes before serving. I know it’s hard to wait when it smells this incredible, but this resting time lets everything set up perfectly and prevents a soupy mess.
Sprinkle with fresh parsley for a pop of color, then dig in!
What Goes Great With This
Simple Green Salad – I like something with a tangy vinaigrette to cut through all that creamy richness.
Garlic Bread – Because you need something to soak up every last drop of that cheesy goodness.
Steamed Green Beans or Broccoli – A bright vegetable balances out the meal perfectly.
Storage and Leftovers
- In the Fridge
This keeps beautifully for up to 4 days in an airtight container. Sometimes I portion it into individual containers for easy grab-and-go lunches.
- Freezer Friendly
Freeze portions for up to 3 months. I like to freeze it in meal-sized portions so I can thaw just what I need.
- Reheating
Oven at 350°F is best for maintaining that creamy texture, but the microwave works in a pinch. Just add a splash of milk if it seems dry.
My Best Tips for Success
Rinse Your Rice: I always give my rice a quick rinse in cold water until it runs clear. This removes excess starch and prevents gummy rice.
Don’t Skip the Rest: Letting the casserole sit for those few minutes makes all the difference. It’s like the final puzzle piece falling into place.
Quality Cheese Matters: I splurge on good sharp cheddar. It melts better and has so much more flavor than the pre-shredded stuff.
Brown Rice Adjustment: If you want to use brown rice, add an extra 15-20 minutes to the covered baking time and maybe a splash more liquid.
Mix It Up Your Way
Protein Swaps: Chicken thighs work beautifully here and stay even more moist. You could also use leftover rotisserie chicken (just add it with the cheese in the last 15 minutes).
Soup Variations: Cream of chicken soup is delicious too, or try cream of celery for something different.
Cheese Adventures: I’ve mixed in some mozzarella with the cheddar for extra stretch, or added a sprinkle of Parmesan for more depth.
Nutritional Information
| Nutritional Information | Per Serving (Serves 8) |
|---|---|
| Calories | 416 |
| Protein | 28g |
| Carbs | 40g |
| Fat | 15g |
| Fiber | 2g |
| Sodium | 900mg |
Your Questions Answered
Can I make this in a slow cooker?
Absolutely! Use the same ingredients but cook on low for 6-7 hours or high for 3-4 hours. Add the cheese in the last 30 minutes.
What about instant rice?
You can use it, but reduce the liquid by about ½ cup and cut the baking time to 30 minutes total. Keep an eye on it so it doesn’t get mushy.
Can I prep this ahead?
Yes! Assemble everything except the cheese, cover, and refrigerate for up to 24 hours. Let it sit at room temperature for 20 minutes before baking, then proceed as normal.
Conclusion
This casserole has saved me on countless hectic weeknights, and I have a feeling it’s going to become your new best friend too. There’s something magical about a dish that requires so little effort but delivers such big, comforting flavors.
The best part? Every time I make it, someone asks for the recipe. And now I get to send them right here to you.
So go ahead, give yourself permission to make dinner the easy way tonight. Your family will be happy, your kitchen will stay clean, and you’ll have leftovers that taste even better tomorrow. That sounds like a win-win-win to me.