

Last Friday night was one of those chaos-filled evenings where my toddler had dumped half a bag of goldfish crackers on the floor, my husband was frantically searching for his work laptop charger, and I suddenly remembered I’d invited friends over for dinner.
With exactly zero dessert plan and about twenty minutes before they arrived.
I stared into my fridge like it might magically produce a fancy dessert. Then I spotted heavy cream tucked behind the milk, remembered I had cocoa powder somewhere, and thought: why not?
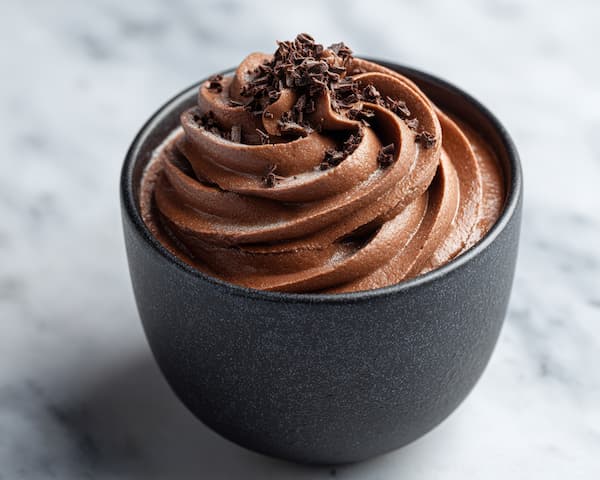
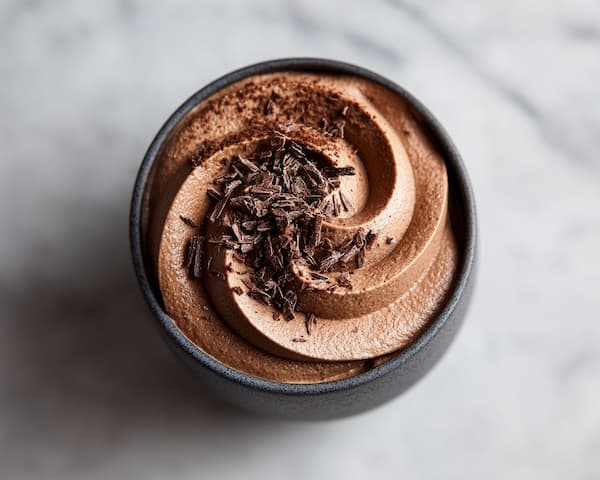
This 3-ingredient chocolate mousse saved my evening. Rich. Silky. Foolproof.
The best part? My friends thought I’d been planning this elegant dessert all week. Little did they know I whipped it up while simultaneously wiping sticky fingerprints off the coffee table and reminding my husband where we keep the good napkins.
If you need a dessert that looks like you spent hours but takes minutes to make, this one’s for you.
Why This Chocolate Mousse is Pure Magic
The beauty lies in pure simplicity -Three ingredients is pretty sweet, and you get that rich, restaurant-quality texture without any fussy techniques.
Just whip, fold, chill, and magic happens – Watch people’s faces light up when they taste it – that’s the real reward for minimal effort.
Perfect for any occasion – Whether it’s dinner parties, last-minute company, or those random Tuesday nights when you need something indulgent after the kids are finally asleep.
It works every single time – Foolproof doesn’t even begin to describe how reliable this recipe is – you’ll never have a kitchen disaster with this one.
Restaurant-quality results at home. Get that professional dessert experience without the professional hassle or skill level required.
Ingredients
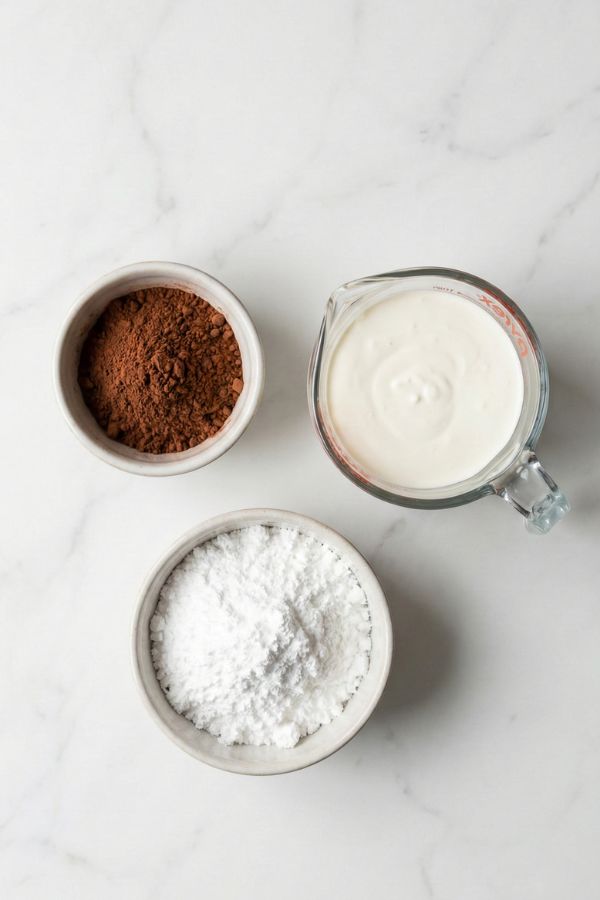
| Ingredient | Amount |
| Heavy whipping cream | 1½ cups |
| Unsweetened cocoa powder | ¼ cup |
| Powdered sugar | ½ cup |
That’s it. Three pantry staples that probably live in your kitchen right now.
Essential Tools
You don’t need fancy equipment, but having the right tools makes this process so much smoother:
- Large mixing bowl – Gives the cream room to expand as it whips
- Electric hand mixer or whisk – A whisk works, but your arm will thank you for the mixer
- Fine mesh sieve – This is your secret weapon against lumpy cocoa
- Rubber spatula – For gentle folding that keeps the mousse airy
- Measuring cups and spoons – Precision matters here
Step-by-Step Instructions
Step 1: Get Everything Cold
Pop your mixing bowl and mixer beaters in the fridge for 15 minutes. Cold equipment helps the cream whip faster and hold its shape better. I learned this trick from my mom, and it’s been a game changer.
Step 2: Prep the Cocoa
Sift that cocoa powder through a fine mesh sieve into a small bowl. Trust me on this one. I’ve skipped this step before and ended up with tiny chocolate pebbles in my otherwise silky mousse. Not cute.
The sifted cocoa should look like fine, dark powder without a single lump in sight.
Step 3: Whip the Cream
Pour the heavy cream into your chilled bowl. Start mixing on medium speed until you see soft peaks forming, about 2-3 minutes. The cream should look like fluffy clouds that gently fold over when you lift the beaters.
Don’t rush this part. Medium speed gives you more control than high speed.
Step 4: Add the Sugar
Gradually sprinkle in the powdered sugar while mixing on low speed. Continue until the cream reaches stiff peaks, another minute or so. You’ll know it’s ready when the peaks stand straight up without drooping.
Here’s where I used to go wrong: I thought stiffer was always better. But you want stiff peaks that still look smooth and creamy, not grainy and overbeaten.
Step 5: Fold in the Cocoa
This is the most important step. Add the sifted cocoa powder to your whipped cream. Using a rubber spatula, gently fold it in with a cutting and turning motion, rotating the bowl as you go.
The key word here is gentle. You’re trying to incorporate the cocoa without knocking out all that air you just whipped in. It should take about 30-45 seconds and result in an even chocolate color with no streaks.
Step 6: Check Your Work
Give the mousse a final look. It should be thick, smooth, and completely uniform in color. If you see any cocoa streaks, fold just a few more times. If it looks grainy or starts to separate, you’ve probably overmixed it.
Step 7: Portion and Chill
Divide the mousse between 4-6 small bowls, ramekins, or pretty glasses. I like using clear glasses because you can see that gorgeous chocolate color.
Cover each serving with plastic wrap (press it gently onto the surface to prevent a skin from forming) and refrigerate for at least 2 hours. Overnight is even better if you’re planning ahead.
Storage and Serving Tips
This mousse keeps beautifully in the fridge for up to 3 days, though it rarely lasts that long in my house. Don’t try to freeze it though; the texture gets weird when it thaws.
For serving, I sometimes add a dollop of whipped cream or a few fresh berries on top. My husband likes his with a sprinkle of sea salt, which actually brings out the chocolate flavor in the most amazing way.
Pro Tips for Perfect Mousse
Temperature matters: Cold cream whips better and holds its shape longer. If your kitchen is warm, chill everything extra.
Don’t skip the sifting: Those tiny cocoa clumps will haunt you in every bite if you skip this step.
Watch the peaks: Soft peaks for step 3, stiff peaks for step 4. Overwhipped cream turns into butter, and there’s no coming back from that.
Fold, don’t stir: The folding motion preserves all those air bubbles that make the mousse light and fluffy.
Nutritional Information (Per Serving, 6 Servings)
| Nutrient | Amount |
| Calories | 280 |
| Total Fat | 24g |
| Protein | 2g |
| Total Carbs | 16g |
| Fiber | 1g |
| Net Carbs | 15g |
Note: Values are approximate and may vary based on specific brands used.
Frequently Asked Questions
Can I use regular granulated sugar instead of powdered? Powdered sugar dissolves much better and gives you that smooth texture. Granulated sugar will leave your mousse gritty.
What if I don’t have cocoa powder? You can use melted dark chocolate instead. Use about ⅓ cup of melted chocolate, let it cool slightly, then fold it in very gently.
My mousse turned out too thick. What happened? Probably overmixed during the folding stage. Next time, fold more gently and stop as soon as the color is even.
Can I make this ahead? Absolutely! It’s actually better after sitting overnight. The flavors meld together and the texture becomes even more luxurious.
Final Thoughts
This 3-ingredient chocolate mousse has become my go-to rescue dessert. It’s saved me from more dinner party disasters than I can count, and it’s fancy enough that people always ask for the recipe.
The best part? Watching my family’s faces when they take that first spoonful. My toddler calls it “chocolate clouds,” which honestly might be the most accurate description I’ve ever heard.
So next time you need a dessert that looks impressive but won’t stress you out, give this one a try. Your future self (and your dinner guests) will thank you.
Now go grab that cream and start whipping. Trust me, you’re about to make some people very happy.